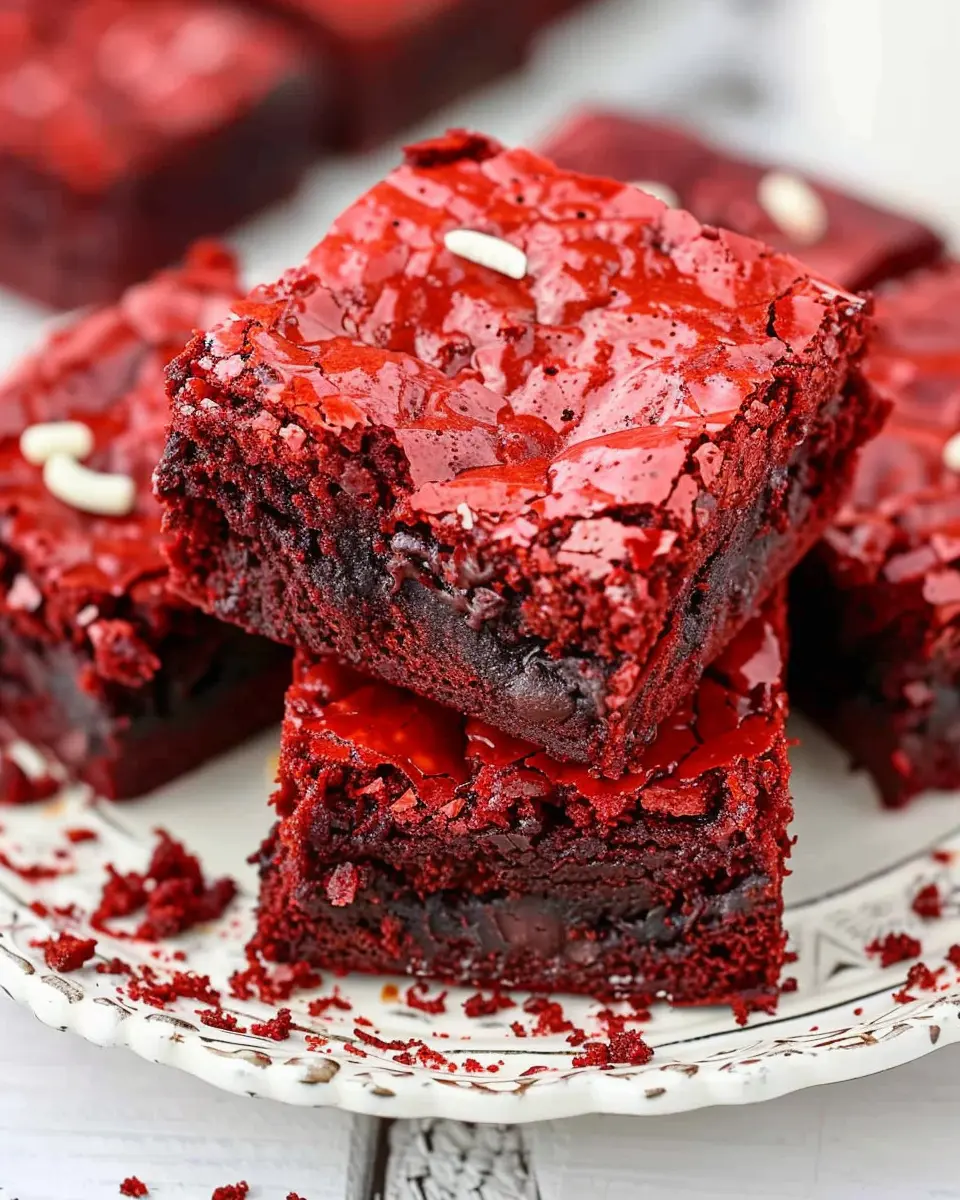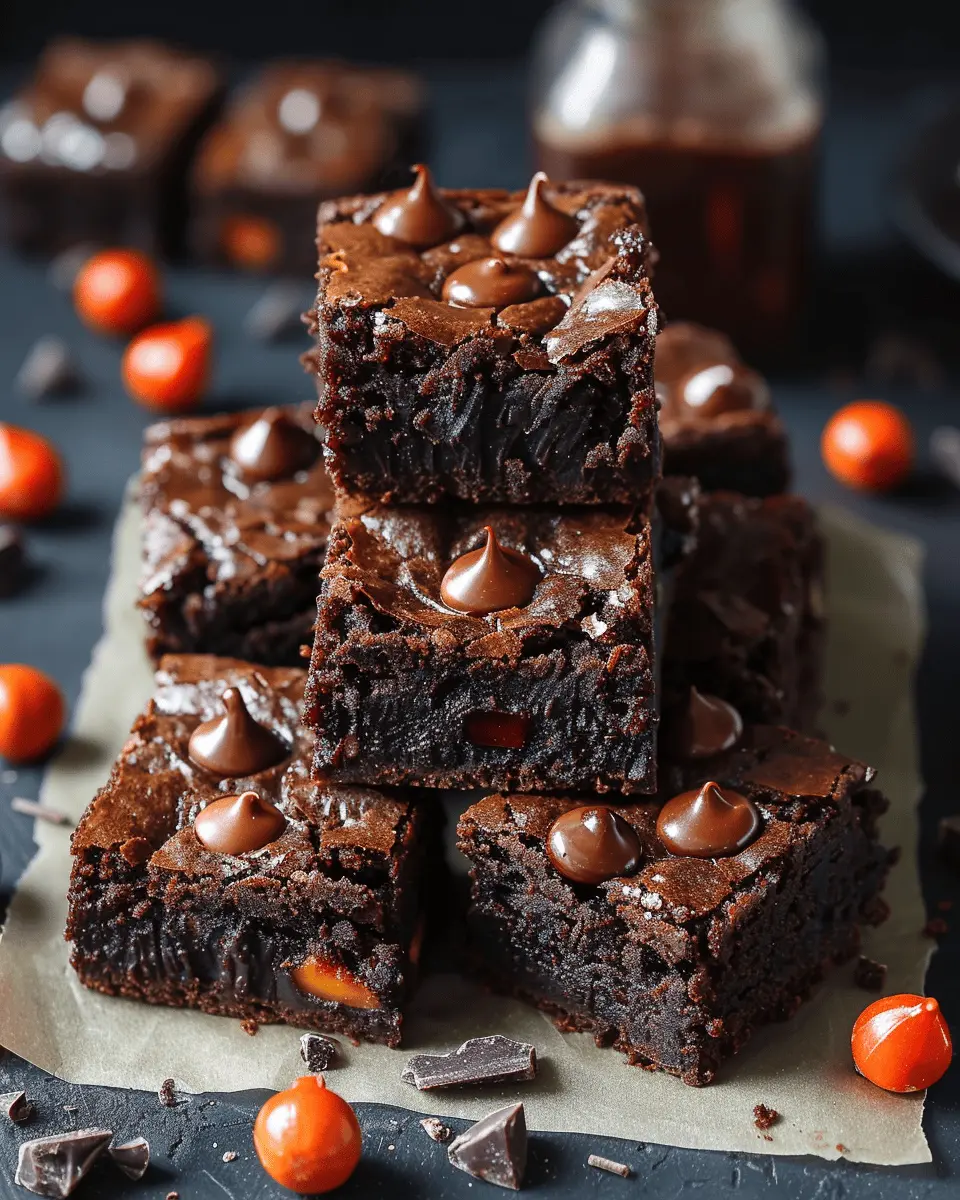
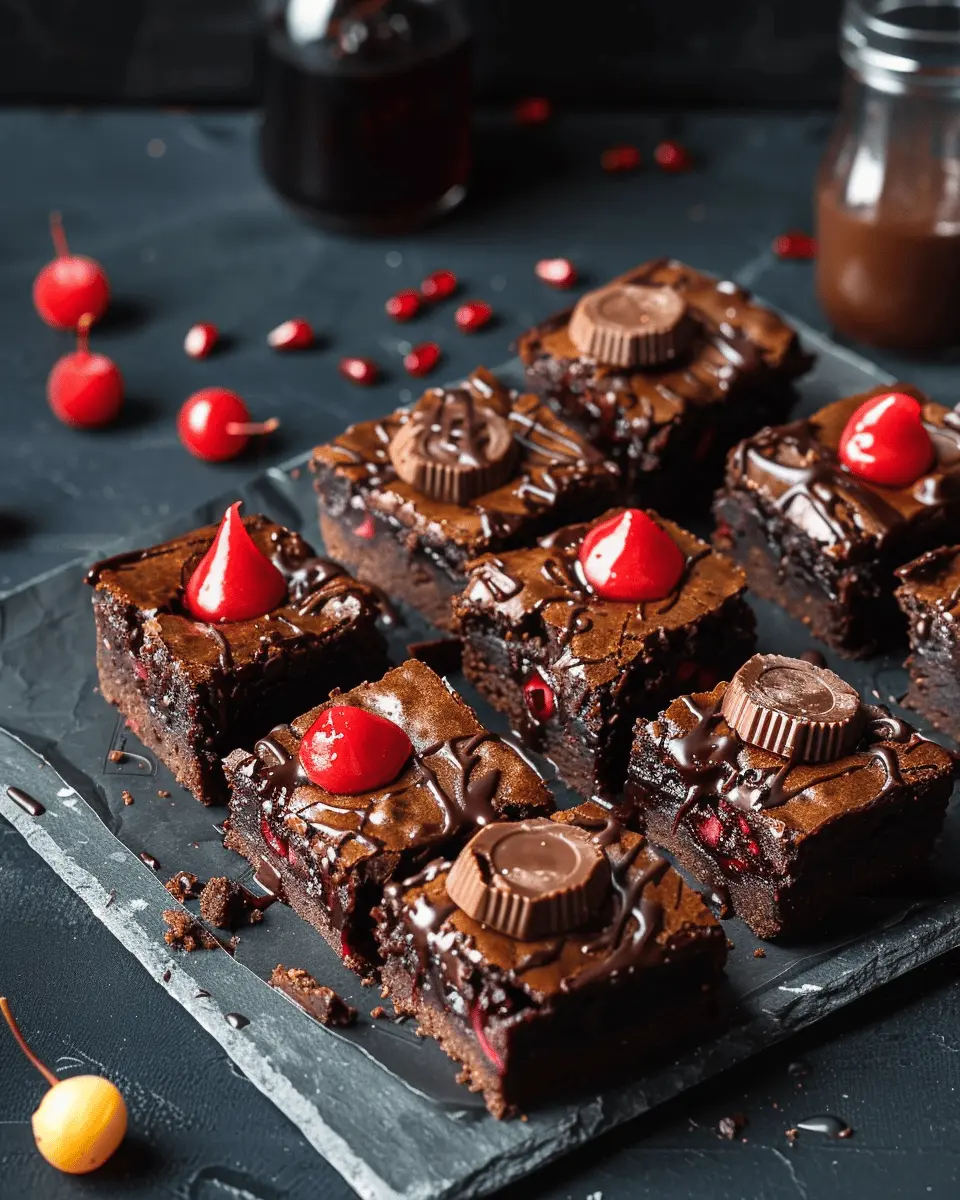
Introduction to Vampire Bite Brownies
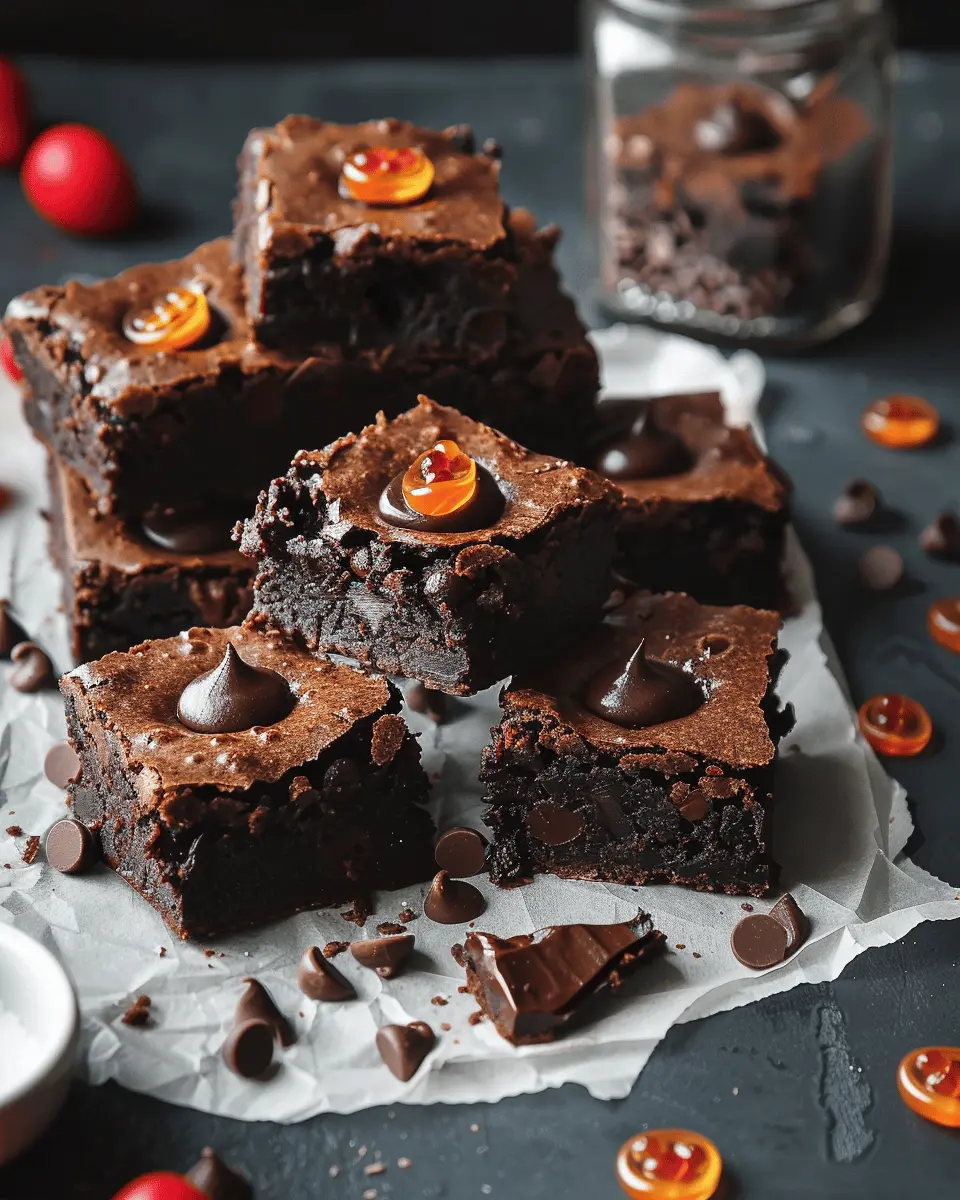
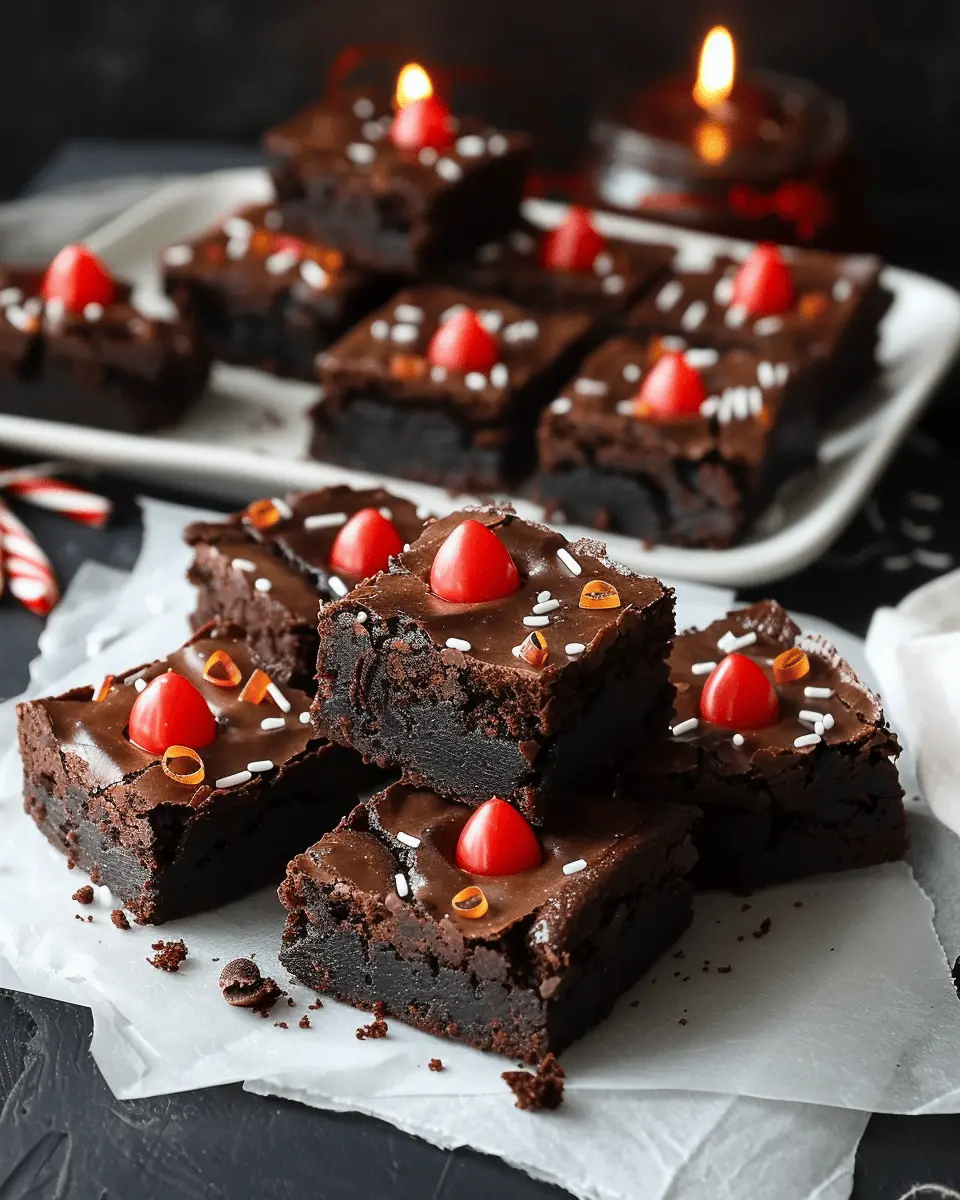
If you’re in the mood for a dessert that combines indulgence with a hint of Halloween-themed fun, look no further than Vampire Bite Brownies. These delightful treats not only satisfy your sweet tooth but also bring a playful flair to any gathering, making them the perfect addition to Halloween parties or casual get-togethers. Imagine serving up rich, fudgy brownies, overflowing with luscious, blood-red raspberry filling that spills out like a “vampire bite” when you cut into them. Tempting, right?
What makes Vampire Bite Brownies a must-try dessert?
The allure of vampire bite brownies lies in their unique presentation and flavor profile. Here’s why these brownies deserve a spot on your dessert table:
-
Visually Striking: The contrast between the deep chocolate brown of the brownie and the vibrant red of the raspberry filling creates an eye-catching dish that’s sure to impress your guests.
-
Rich and Fudgy Texture: Bake these brownies to achieve that perfect gooey center. Made with quality ingredients like dark chocolate and butter, every bite melts in your mouth, giving you a rich chocolate experience.
-
A Flavor Explosion: The combination of luscious chocolate and tart raspberries is an explosion of flavor. According to renowned pastry chefs, the pairing of raspberry and chocolate is a classic that’s both refreshing and indulgent (source).
-
Easy to Make: Do you think you can’t bake? Think again! This recipe is straightforward, requiring minimal effort while delivering maximum impact. You can whip up these brownies in less than an hour, making them perfect for last-minute plans!
-
Perfect for Customization: Feel free to unleash your creativity! Add in extra treats such as chopped nuts or even a sprinkle of sea salt on top for a gourmet touch. Or try experimenting with different fillings like cherry or strawberry—any fruit that evokes that “blood” vibe makes for a great fit.
As you embark on your journey to make these treats, remember, the more personal you make them, the more they’ll resonate with your friends and family. So grab your apron, and let’s get started on these vampire bite brownies!
Ingredients for Vampire Bite Brownies
Essential ingredients for the brownies
When it comes to creating the perfect vampire bite brownies, you’ll want to gather some essential ingredients that ensure a rich, fudgy texture. Here’s what you’ll need:
- 1 cup unsalted butter: For that perfect melt-in-your-mouth quality.
- 2 cups granulated sugar: Sweetness is a must for brownies!
- 4 large eggs: These will keep your brownies moist and fluffy.
- 1 cup all-purpose flour: A classic base that gives your brownies structure.
- 1 cup cocoa powder: The star ingredient for that deep chocolate flavor.
- 1 teaspoon vanilla extract: A splash of vanilla enhances all the flavors.
- 1/2 teaspoon salt: To balance out the sweetness.
Don’t forget to check out Bon Appétit’s guide on baking ratios for more insights on perfecting your brownie recipe!
Extras for the “blood” topping
Now, let’s add an extra spooky touch to your vampire bite brownies with a delicious “blood” topping. Here are the extras you’ll need:
- Red icing (store-bought or homemade): Perfect for piping over your brownies.
- Raspberry jam or strawberry preserves: Adds both flavor and a slimy appearance that’s oh-so-fun!
- Corn syrup: To give your blood a glossy finish and realistic look.
With these ingredients, your vampire bite brownies will not only taste incredible but also look hauntingly delicious—perfect for your Halloween gathering or themed party!
Preparing Vampire Bite Brownies
Are you ready to whip up a batch of vampire bite brownies that are sure to impress your friends and trick-or-treaters alike? These spooky treats are not only delicious but also visually captivating. Let’s dive into the steps to create your very own batch of chocolatey delight, complete with a creamy swirl that adds the perfect finishing touch!
Preheat the Oven
The first step in preparing your vampire bite brownies is to preheat your oven to 350°F (175°C). Preheating is crucial—this ensures that your brownies bake evenly throughout. While the oven warms up, this is a good time to prepare your baking pan; line it with parchment paper for easy removal later, or generously grease the pan to prevent sticking. Trust me, the last thing you want is to lose half of your delectable brownies to the pan!
Prepare the Brownie Mix
Next, grab your favorite brownie mix. Whether you choose a box mix for convenience or decide to make it from scratch, the key is to follow the instructions carefully. If you’re going for a box mix, you’ll typically need:
- 1 box of brownie mix
- 1/3 cup vegetable oil
- 2 large eggs
Mix these ingredients together in a bowl until just combined. Be careful not to over mix! You want your brownie batter to remain thick and fudgy, which is part of what makes these brownies so irresistible.
For those curious about the nutritional aspects of baking, this site provides excellent insights into the ingredients you might choose: Healthline on Baking Essentials.
Create the Cream Cheese Mixture
While your brownie mix is coming together, it’s time to prepare the star of the show: the cream cheese mixture. In a separate bowl, beat together:
- 1 package (8 oz) of cream cheese (softened)
- 1/2 cup granulated sugar
- 1 teaspoon vanilla extract
- 1 large egg
This mixture should be smooth and creamy, allowing it to swirl beautifully into the brownie batter.
Swirl the Cream Cheese into the Brownie Batter
Now comes the fun part of creating your vampire bite brownies! Pour about half of your brownie batter into the prepared baking pan, then dollop the cream cheese mixture evenly over the top. Use a spoon to dot the remaining brownie batter on top of the cream cheese layer. Finally, take a knife or a skewer and swirl it through the layers.
This is where your creativity shines! You want those swirls to be visible but don’t overdo it—keep some definition between the brownie and cream cheese. The finished look should resemble dramatic bloodstains, just right for Halloween!
Bake the Brownies to Perfection
Place the pan in your preheated oven and let them bake for about 25 to 30 minutes. Keep an eye on them; since all ovens can vary in temperature, check for doneness by inserting a toothpick into the center. If it comes out with a few moist crumbs, they’re perfect!
Cool and Decorate with “Blood”
Once baked, let the brownies cool in the pan for about 20 minutes. Then, transfer them to a wire rack to cool completely. After they’ve cooled, it’s time for decoration. For a realistic “blood” effect, you can use a simple mix of:
- 1 cup of raspberry or strawberry syrup
- 1 tablespoon of corn syrup
Drizzle this over the brownies for a gruesome yet tasty visual. Cut them into squares, serve, and watch your friends’ eyes light up with delight (or shock)!
By following these steps, you’re on your way to creating vampire bite brownies that not only taste great but look fantastic as well. Happy baking, and enjoy the spooky season!
Variations on Vampire Bite Brownies
Alternative Flavor Twists
Why stick to the classic when you can explore some fun variations of Vampire Bite Brownies? Here are a few ideas to take your brownies to monstrous new heights:
- Mint-Lover’s Delight: Add a few drops of peppermint extract to the batter. Top with crushed candy canes for an extra festive crunch.
- Nutty Indulgence: Stir in chopped walnuts or pecans for a delightful crunch. A sprinkle of sea salt on top pairs beautifully with the sweetness.
- Fruity Surprise: Incorporate fresh raspberries or cherries into the batter. Their tartness will create a delicious contrast with the rich chocolate.
- Spicy Kick: If you’re feeling adventurous, a pinch of cayenne pepper or a dash of espresso powder can add unexpected depth.
For more creative brownie ideas, you might enjoy checking out Brownies: A Makeover!
Gluten-Free Option
Hosting gluten-sensitive friends? No problem! These Vampire Bite Brownies can easily adapt to a gluten-free diet. Just replace all-purpose flour with a 1:1 gluten-free baking blend.
Make sure to check the label of your baking chocolate and any additional toppings, as some can contain gluten. To enhance texture, consider adding a tablespoon of almond flour or coconut flour to the mix.
This gluten-free twist allows everyone at your gathering to join in on the deliciousness without worry. Give it a try and watch your friends devour every bite!
Embrace your kitchen creativity and experiment with these variations to ensure your Vampire Bite Brownies become a fan favorite!
Cooking tips for Vampire Bite Brownies
Preventing overcooking
Avoiding overcooked vampire bite brownies is crucial for that fudgy, gooey texture we all love. Start by checking for doneness a few minutes before the suggested baking time. Insert a toothpick into the center; it should come out with a few moist crumbs clinging to it, not completely clean. Remember, the brownies will continue to cook slightly as they cool. Use an oven thermometer to ensure your oven’s temperature is accurate, as discrepancies can lead to uneven baking.
How to create perfect swirl patterns
Creating those eye-catching swirl patterns in your vampire bite brownies adds a fun, artistic touch. After pouring half of your brownie batter into the pan, dollop spoonfuls of your favorite red berry jam or cherry filling on top. Using a skewer or a butter knife, gently drag it through the batter in a zigzag motion. Be careful not to overmix; you want to retain the defined swirls for a dramatic effect.
Using these tips will elevate your vampire bite brownies to a whole new level! Check out this guide on baking tips for more insights. And for variations, explore ideas on how to incorporate seasonal flavors into your brownies!
Serving suggestions for Vampire Bite Brownies
Pairing ideas for added fun
When you’re ready to serve your Vampire Bite Brownies, consider pairing them with an enchanting array of snacks and drinks. A rich, creamy hot chocolate or a spiced apple cider can complement the chocolate’s sweetness beautifully. For a playful twist, why not set up a ‘blood bar’ using berry syrups or cherry compote? It’s a fantastic way to engage guests and take those brownie moments to the next level!
You could also introduce some savory snacks like roasted pumpkin seeds or turkey bacon bites. This salty-sweet combination will keep everyone reaching for more. Try serving them alongside a crunchy vegetable platter with hummus for a balanced touch!
Presentation tips for spooky gatherings
Elevate your dessert table with these fun presentation ideas! Make your Vampire Bite Brownies the stars of the show by placing them on a decorative platter, adorned with faux spider webs and plastic spiders for a wonderfully creepy vibe. You could even use festive cupcake liners to give your brownies a touch of flair.
Feel free to sprinkle a dusting of powdered sugar on top for a ghostly effect or drizzle with red frosting to mimic blood. Using themed plates and cute labels can further enhance your gathering’s spooky atmosphere. If you want to impress, check out some party-planning guides from sources like Martha Stewart or Good Housekeeping for even more creative ideas!
Time breakdown for Vampire Bite Brownies
When you’re in the mood to whip up some delightful vampire bite brownies, knowing the time commitment can make all the difference. Here’s a quick guide to keep your baking adventure smooth and enjoyable.
Preparation time
Get your kitchen utensils ready! The preparation time for these delicious brownies takes about 15-20 minutes. This is the perfect time to gather your ingredients, mix things up, and let your imagination run wild.
Cooking time
Once you pop those brownies into the oven, give them about 25-30 minutes to bake. Make sure to keep an eye on them towards the end to achieve that perfect fudgy texture.
Total time
Altogether, you’re looking at around 40-50 minutes from start to finish. Just enough time to prepare for the delicious reactions when your friends and family take that first bite! So grab a friend, or make it a solo mission, and enjoy the process of creating your vampy treats.
Want more baking tips? Check out The Kitchn for expert advice!
Nutritional Facts for Vampire Bite Brownies
Calories
Each serving of vampire bite brownies packs around 200 calories. While they’re certainly a treat, keeping an eye on serving size can help you satisfy your sweet tooth without going overboard.
Protein
These delicious brownies offer about 3 grams of protein per serving. While not a significant source, teaming them with a glass of milk can boost your protein intake and create a perfectly paired snack.
Sugar Content
With approximately 18 grams of sugar, these brownies are on the sweeter side. If you’re looking to reduce sugar, consider using a natural sweetener like maple syrup. For those curious about healthier baking substitutes, sites like Healthline can provide some great ideas.
Incorporating vampire bite brownies into your repertoire can be delightful when enjoyed in moderation. Have you considered what fun twists you could add to this classic dessert?
FAQs about Vampire Bite Brownies
How do I make my brownies fudgier?
To achieve that ultimate fudgy texture for your vampire bite brownies, there are a few tricks you can adopt:
- Choose high-quality chocolate: Use good-quality dark chocolate or cocoa powder. The better the chocolate, the richer the flavor.
- Reduce flour: Cutting back on the flour slightly can help keep them dense and moist.
- Add an extra egg: Incorporating an additional egg can help bind the ingredients while adding a luscious richness.
If you’re curious to dive deeper into the science of baking for fudgier results, check out this comprehensive baking guide.
Can I substitute ingredients in the recipe?
Absolutely! Here are some fun substitutions for vampire bite brownies to customize them to your taste:
- Gluten-free: Use a 1:1 gluten-free flour blend for those who need a gluten-free option.
- Dairy-free: Swap in coconut oil or a dairy-free butter substitute to cater to lactose intolerance.
- Nut-free: If you’re allergic to nuts, you can simply omit them or replace them with seeds such as pumpkin or sunflower seeds for a crunchy twist.
Feel free to mix your creative spins while maintaining that infamous vampire bite flair!
What’s the best way to store leftover brownies?
Storing your delicious vampire bite brownies is key to keeping them fresh:
- Room temperature: If you plan to eat them within a few days, store them in an airtight container at room temperature.
- Refrigerate for longer-lasting freshness: For up to a week, place them in the fridge.
- Freezing: If you want to keep them even longer, wrap them tightly in plastic wrap and store them in the freezer for up to three months.
Nobody likes a dried-out brownie, so follow these tips to ensure every bite is decadent and delicious! For more baking hacks, you can visit Cooking Light.
Conclusion on Vampire Bite Brownies
Final thoughts on enjoying your homemade treat
As you indulge in your delicious Vampire Bite Brownies, remember that the joy of baking lies in sharing these delectable treats with friends and family. Whether you’re hosting a Halloween party or simply treating yourself after a long week, these brownies can elevate any gathering. Their rich chocolaty goodness, complemented by a vibrant red “bite,” is sure to impress.
Don’t hesitate to experiment with your own twists, such as swapping in some Turkey Bacon or adding a hint of chili for an unexpected kick. Baking is about creativity and enjoying flavors. For more tips on making your desserts even more delightful, check out resources like The Kitchn and Serious Eats. So, gather your ingredients and let the fun begin—your taste buds will thank you!
PrintVampire Bite Brownies: Indulgent Treats for Sweet-Toothed Ghouls
These Vampire Bite Brownies are the perfect indulgent treat for anyone with a sweet tooth. Gooey, chocolaty, and a little spooky, they are guaranteed to impress your friends and family.
- Prep Time: 20 minutes
- Cook Time: 35 minutes
- Total Time: 55 minutes
- Yield: 24 servings 1x
- Category: Desserts
- Method: baking
- Cuisine: American
- Diet: vegetarian
Ingredients
- 1 cup unsalted butter
- 2 cups granulated sugar
- 4 large eggs
- 1 teaspoon vanilla extract
- 1 cup all-purpose flour
- 1 cup unsweetened cocoa powder
- 1 teaspoon baking powder
- 1/2 teaspoon salt
- 1 cup chocolate chips
- 1 cup red frosting
- 1 package gummy vampire teeth
Instructions
- Preheat your oven to 350°F (175°C) and grease a 9×13 inch baking dish.
- In a large bowl, melt the butter and then mix in the sugar until combined.
- Beat in the eggs one at a time, then stir in the vanilla extract.
- In a separate bowl, combine the flour, cocoa powder, baking powder, and salt.
- Gradually add the dry ingredients to the wet ingredients until just blended.
- Fold in the chocolate chips.
- Pour the brownie batter into the prepared baking dish and smooth the top.
- Bake for 30-35 minutes or until a toothpick comes out clean.
- Allow the brownies to cool completely before frosting.
- Once cooled, spread the red frosting on top and place the gummy teeth in the frosting to create the ‘bite’ effect.
Notes
- Make sure to let the brownies cool fully to ensure clean cuts.
- Decorate with additional candy for a spookier look!
Nutrition
- Serving Size: 1 brownie
- Calories: 250
- Sugar: 22g
- Sodium: 200mg
- Fat: 12g
- Saturated Fat: 7g
- Unsaturated Fat: 3g
- Trans Fat: 0g
- Carbohydrates: 35g
- Fiber: 2g
- Protein: 3g
- Cholesterol: 50mg
Keywords: Vampire Bite Brownies, Halloween Treats, Brownies, Ghoulish Desserts