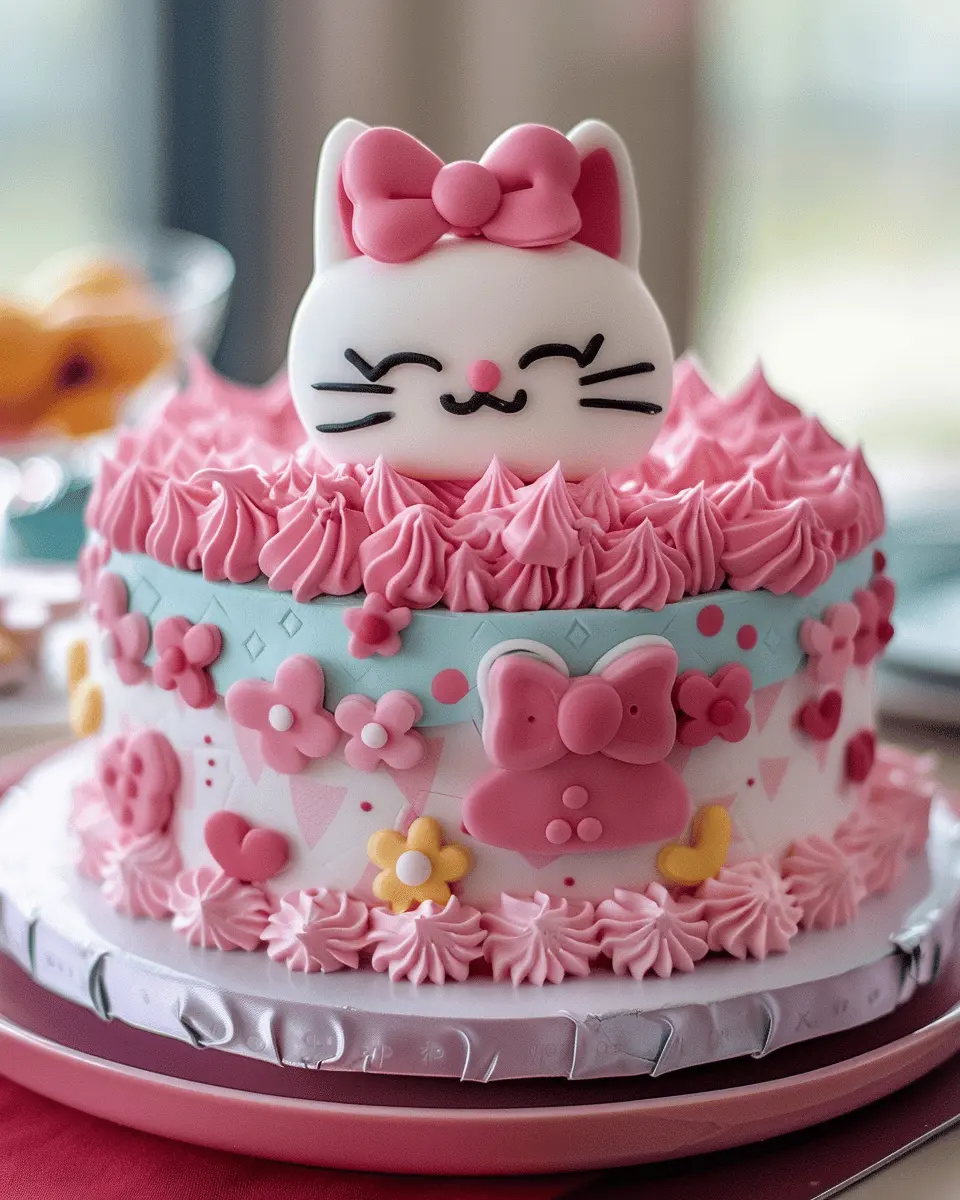
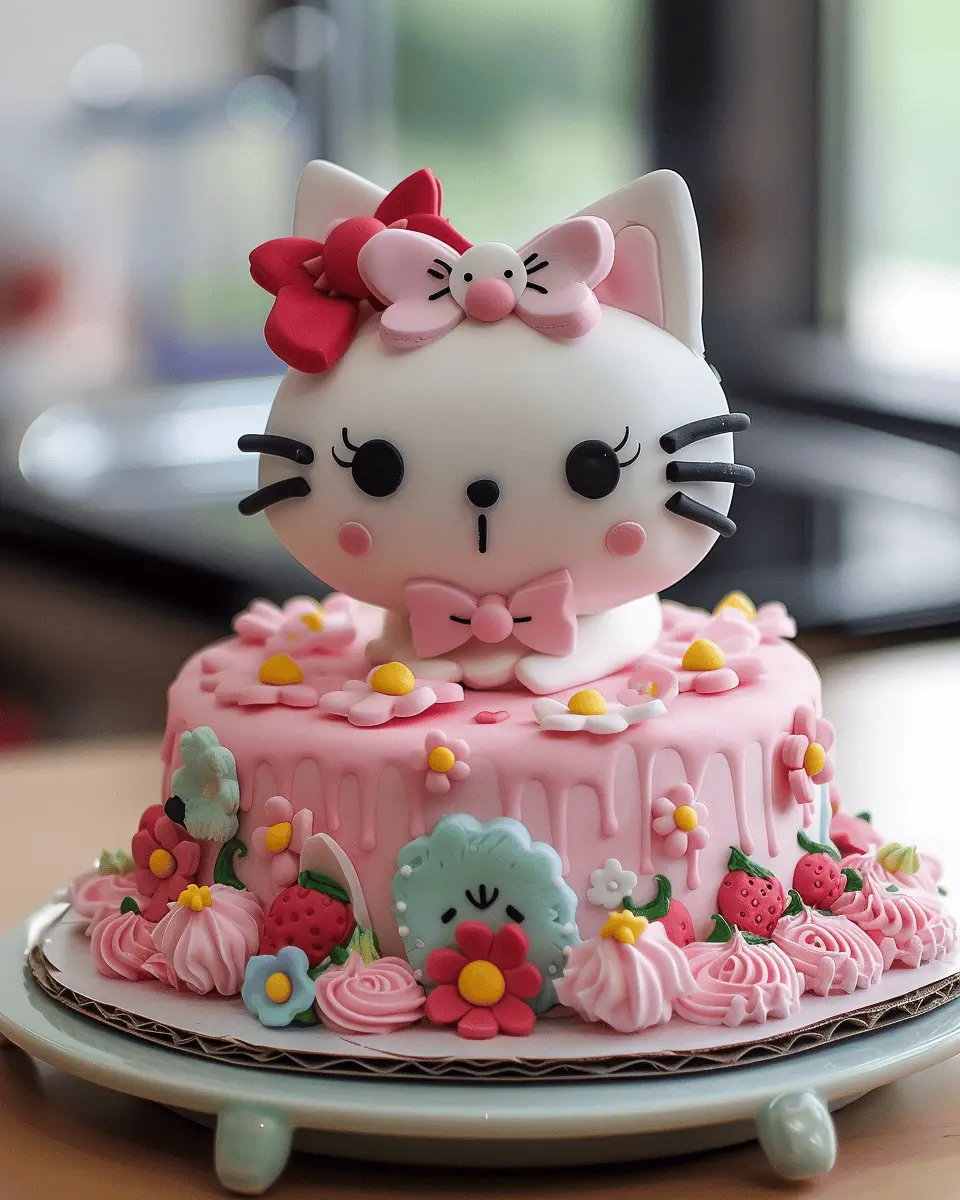
Introduction to Hello Kitty Cake
The nostalgia of Hello Kitty
For many of us, Hello Kitty isn’t just a cute character; she’s a beloved figure steeped in nostalgia. Created in 1974, Hello Kitty has been part of our lives in various forms—whether it’s on school supplies, clothing, or even in our kitchens. As adults, we often find ourselves reminiscing about those simpler times, and crafting a Hello Kitty cake can be a delightful way to channel that nostalgia. Just imagine baking a cake adorned with this iconic character for a birthday party or a baby shower—it’s a surefire way to bring smiles and transport people back to their carefree childhood days. If you’re looking to dive deeper into the history of Hello Kitty, check out Sanrio’s official history page for a fun read!
Why homemade cakes are better
In today’s fast-paced world, it’s easy to opt for a store-bought cake. However, haven’t you noticed how a homemade cake always seems to have that extra special touch? When you bake a cake from scratch, you control all the ingredients, ensuring that it’s not only delicious but also tailored to your preferences. Studies suggest that the act of baking can be therapeutic, helping reduce stress and boost your mood. So why not indulge in a little self-care while creating something sweet?
- Customize flavors and designs
- Use high-quality, fresh ingredients
- Create lasting memories in the kitchen
The joy of baking for special occasions
There’s an unparalleled joy in baking for special occasions. Picture this: You’re gathering with friends and family, and everyone’s chatting excitedly while you unveil your beautifully crafted Hello Kitty cake. The look of surprise and delight on their faces makes all the effort worthwhile. Not only does it taste great, but it also serves as a centerpiece that sparks conversation and stories. Plus, you’re passing down a cherished tradition of baking that can be enjoyed for generations to come.
So, let’s get those ovens preheated and roll up our sleeves! Whether it’s for a birthday, a baby shower, or just because, this Hello Kitty cake recipe is bound to be a hit. Ready to start baking?
Ingredients for Hello Kitty Cake
Creating a delightful Hello Kitty cake starts with gathering the right ingredients. Let’s break it down!
Essential ingredients list
To whip up this charming cake, you’ll need:
- 2 cups all-purpose flour
- 1 ½ cups granulated sugar
- 1 cup unsalted butter or a dairy-free alternative
- 1 cup milk or a plant-based milk option
- 4 large eggs
- 2 teaspoons baking powder
- 1 teaspoon vanilla extract
- Food coloring (pink and white for that signature Hello Kitty look)
- Fondant for decorating
These ingredients come together to create a moist cake that will impress any fan of Hello Kitty (and let’s be honest, who isn’t a fan?).
Alternative options for dietary needs
If you’re catering to specific dietary needs, there are options! You can easily substitute:
- Use almond or coconut milk instead of regular milk
- Swap out butter for coconut oil or a plant-based spread
- Opt for gluten-free flour for a gluten-free variant
These alternatives ensure everyone can enjoy a slice of this whimsical Hello Kitty cake! Remember to check out resources for baking substitutions like The Kitchn for more ideas. Happy baking!
Preparing Hello Kitty Cake
Creating a delightful Hello Kitty cake is a fun and rewarding experience, especially if you’re channeling your inner pastry chef. You’ll impress your friends and family with this beautiful confection that’s perfect for any occasion. Let’s take a closer look at each step required to whip up this adorable treat!
Gather your ingredients and tools
Before diving into cake-making, it’s vital to gather all your ingredients and tools. This saves you time and ensures you won’t be scrambling mid-recipe. Here’s a basic list to get you started:
-
Ingredients:
-
2 cups all-purpose flour
-
1 ½ cups granulated sugar
-
1/2 cup butter (softened)
-
1 cup milk
-
3 large eggs
-
1 tbsp baking powder
-
1 tsp vanilla extract
-
A pinch of salt
-
Food coloring (for decoration)
-
Buttercream or fondant (for frosting)
-
Tools:
-
Two 9-inch round cake pans
-
Mixing bowls
-
Electric mixer
-
Spatula
-
Cooling rack
-
Measuring cups and spoons
Having everything ready will help ensure a smooth baking process. Plus, who doesn’t love a well-organized kitchen?
Prepping the cake pans
Now that you’ve got your ingredients, let’s prep your cake pans. It’s crucial to ensure your cakes come out easily without sticking. Start by greasing your pans with butter or oil and then lightly dust with flour. This little technique creates a non-stick barrier, allowing your Hello Kitty cake to release smoothly once baked.
Mixing the dry ingredients
In a separate bowl, begin mixing your dry ingredients. Combine the flour, baking powder, and salt. Whisk them together until there are no lumps. This step might seem simple, but it actually helps distribute the baking powder evenly throughout the flour, making for an even rise. For further guidance on proper mixing techniques, consider checking out Baker’s Tip.
Creaming butter and sugar
Next, it’s time to cream the butter and sugar. In a mixing bowl, combine the softened butter and granulated sugar. Using an electric mixer, beat them together until the mixture is light and fluffy. This step incorporates air into your batter, resulting in a lighter texture. Did you know that the creaming method is one of the most important techniques in baking? It impacts the cake’s structure!
Combining the wet and dry ingredients
Once your butter and sugar are creamed, it’s time to introduce the wet ingredients. Add the eggs, milk, and vanilla extract to the mixture. Gradually mix in your dry ingredients until just combined. Be careful not to overmix, as this can lead to a tough cake. If you want a little extra flavor, consider adding a splash of almond extract!
Baking the cakes to perfection
Now, pour your batter evenly into the prepared cake pans. Bake in a preheated oven at 350°F (175°C) for about 30-35 minutes, or until the cakes spring back when lightly touched. If you’re looking for baking tips, Food Network often has helpful resources.
Cooling your cakes properly
Once your cakes are baked, take them out of the oven and let them cool in the pans for about 10 minutes. Afterward, transfer them to a wire rack to cool completely. Proper cooling is essential as it allows the cakes to firm up. If you frost too soon, the heat can melt your frosting—nobody wants a sloppy Hello Kitty cake!
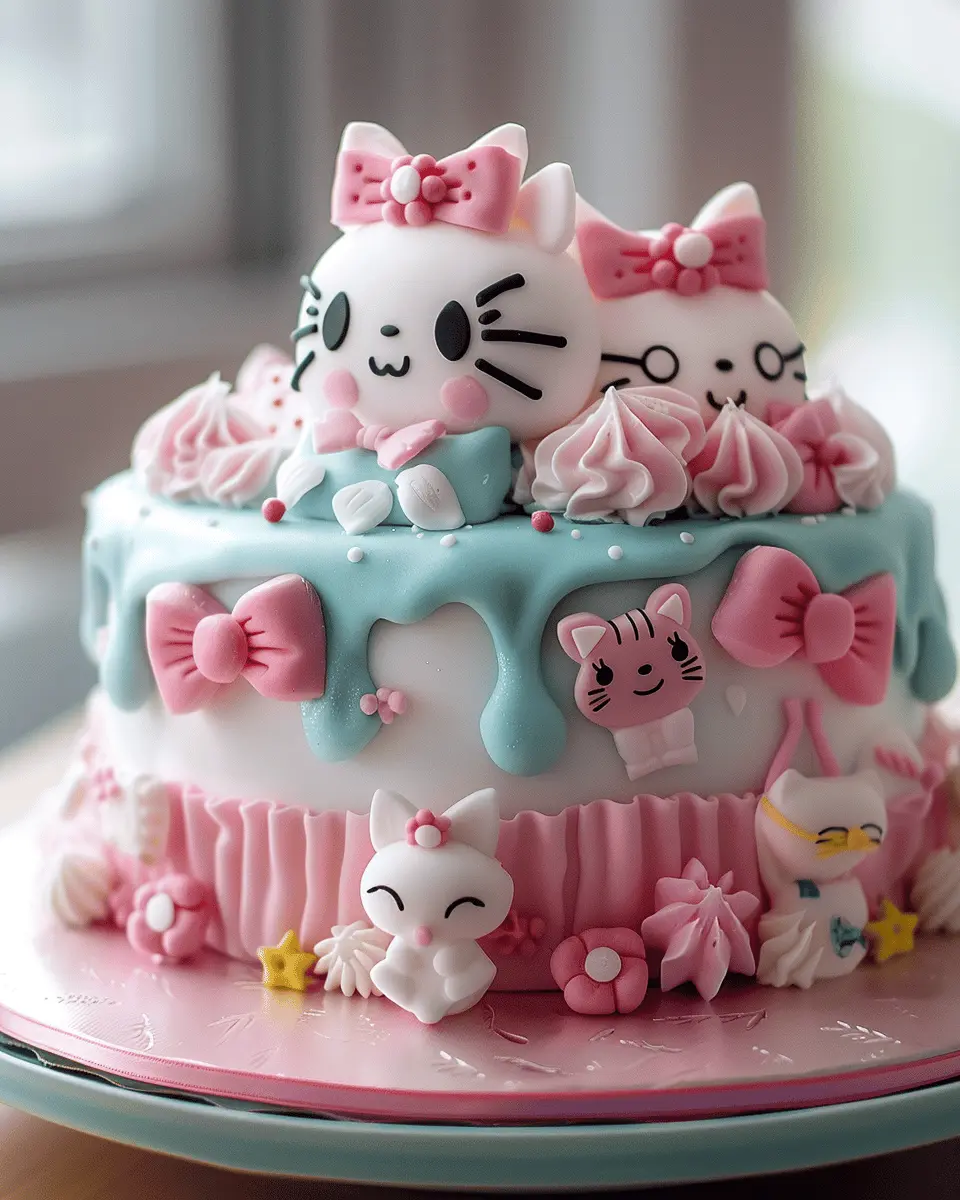
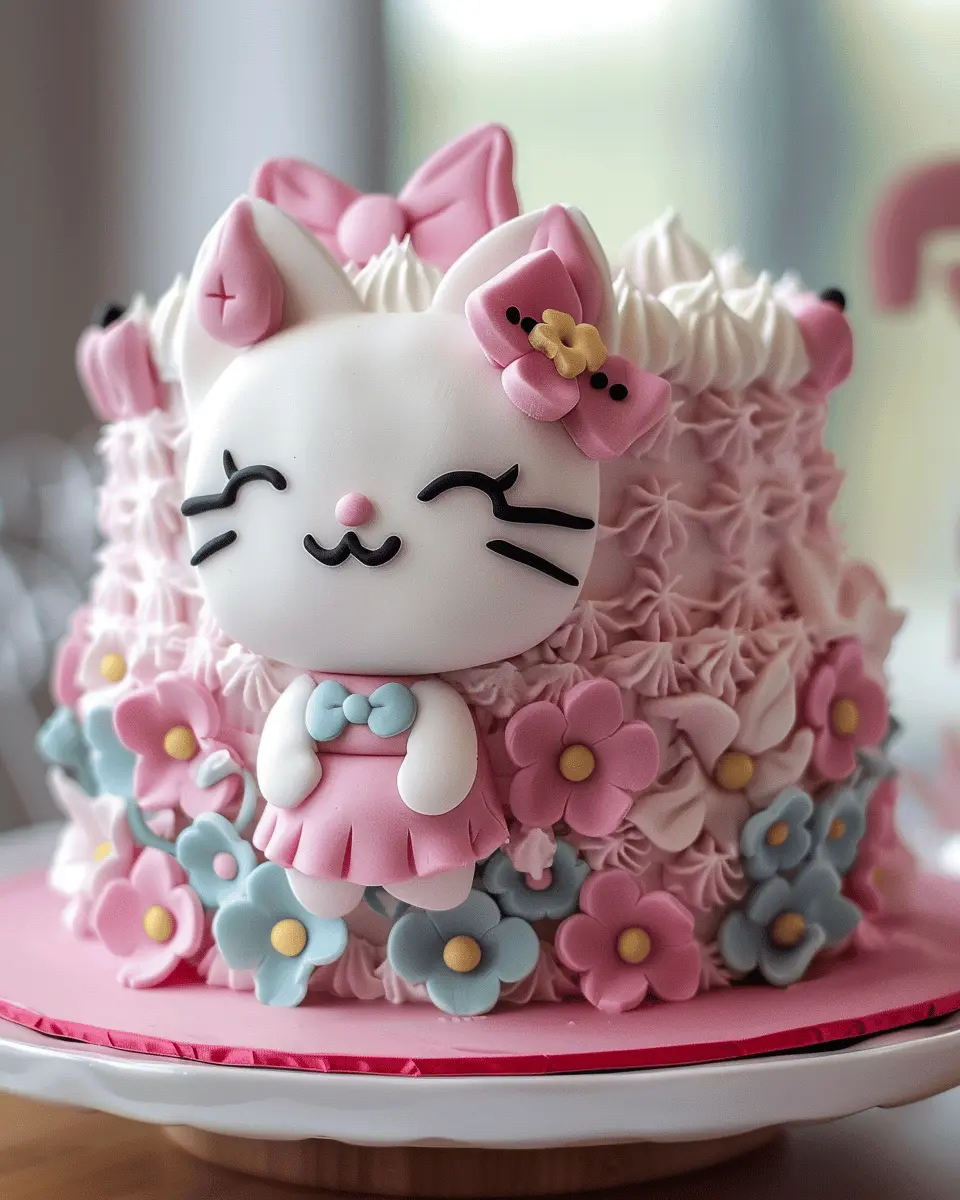
Decorating with buttercream and fondant
Finally, it’s time for the fun part: decorating! You can frost your cooled cakes with buttercream for a classic look, or use fondant for a smoother finish. When creating Hello Kitty’s iconic face, a little precision goes a long way. Use templates or molds to achieve those signature features. Personalizing your design will make your Hello Kitty cake even more special.
With these steps, you’re well on your way to creating a cake that’s not just delicious but also visually captivating. Enjoy the process and share your masterpiece with loved ones!
Variations on Hello Kitty Cake
When it comes to the delightful Hello Kitty cake, the possibilities are endless! Whether you’re planning a birthday party, a baby shower, or just a casual get-together, customizing your cake can make a big impact.
Customizing Flavors for the Cake
Why stick with basic flavors when you can get creative? Consider trying:
- Chocolate with raspberry filling for a decadent twist.
- Lemon vanilla for a refreshing zing that’s perfect for summer.
- Red velvet to impress your guests with a pop of color.
Feel free to experiment with different fillings and icings too! A simple lemon curd or rich cream cheese frosting can elevate your Hello Kitty cake to new heights.
Themed Decorations for Different Occasions
Is it a baby shower, a birthday, or a casual brunch? Tailor your decorations accordingly! Use pastel colors and cute animal toppers for a baby shower or go with vibrant sprinkles and bold colors for a birthday bash. Themed cake designs available on platforms like Pinterest can spark your imagination and guide your decorating choices.
Dietary Variations for Everyone
No one should miss out on delicious cake! Consider these dietary variations for inclusivity:
- Gluten-Free: Use almond flour or gluten-free mixes to ensure your Hello Kitty cake is safe for gluten-sensitive guests.
- Vegan: Substitute eggs with applesauce or flaxseed meal, and use plant-based milk and butter.
Whichever route you take, remember: the creativity and love you put into your Hello Kitty cake are what makes it truly special! For more ideas on mixing flavors and healthier recipes, check out this resource for inspiration on cake customization strategies. Happy baking!
Baking notes for Hello Kitty Cake
Tips for achieving a moist cake
To create a delightfully moist Hello Kitty cake, focus on using fresh ingredients, particularly eggs and butter. Make sure your butter is at room temperature for easy mixing, which helps incorporate air into the batter. Consider adding a splash of sour cream or yogurt — both will not only contribute to moisture but also add a slight tang that balances sweetness. Remember to measure your flour accurately; too much can dry out your cake. Investing in a digital kitchen scale can simplify this process.
Common pitfalls and how to avoid them
One common mistake is overmixing the batter. This can lead to a dense cake rather than the light and fluffy texture we all desire. Mix just until the ingredients are combined, and don’t be afraid of tiny lumps! Additionally, always check your oven temperature with an oven thermometer, as inaccurate temps can ruin your baking adventure. Lastly, let your cake layers cool completely before frosting them; warm layers can cause melting and a messy Hello Kitty design.
For more cake decoration inspiration and tips, check out resources from CakeDecorating.com to elevate your skills!
Serving suggestions for Hello Kitty Cake
Pairing with beverages for a complete experience
When it comes to enjoying your Hello Kitty cake, think beyond just the dessert! Pair it with refreshing beverages for a delightful treat. Consider serving it alongside:
- Sparkling water with a twist of lemon for a refreshing palate cleanser.
- Iced tea infused with fruits like raspberry or peach to enhance that cake sweetness.
- Coffee or espresso, which provides a rich contrast to the light flavors of the cake.
These beverages not only complement the cake but also add a vibrant touch to your gathering.
Ideal occasions for serving Hello Kitty Cake
The Hello Kitty cake is more than just a dessert; it’s a centerpiece that shines at various occasions:
- Birthday parties: Perfect for children and adults who adore this iconic character.
- Baby showers: The sweet and playful design adds a whimsical touch to the celebration.
- Themed gatherings: Great for any Hello Kitty fan event or brunch with friends.
No matter the event, this cake not only tastes delightful but also elevates the festive atmosphere. Looking for more ideas? Check out this expert guide on how to ace your gatherings!
Time details for Hello Kitty Cake
When you’re gearing up to create this adorable Hello Kitty Cake, it’s important to plan your time wisely. Here’s a quick breakdown to help you get started smoothly.
Preparation Time
Before you begin baking, set aside about 30 minutes for preparation. This includes gathering your ingredients, prepping your baking pans, and mixing your batter. It’s the fun part where you can let your creativity flow!
Baking Time
The actual baking for your hello kitty cake will take between 25 to 30 minutes. You want to ensure it’s perfectly cooked, so be sure to check for a golden top and a clean toothpick when inserted.
Decorating and Serving Time
Once your cake has cooled, you’ll want to spend another 30 to 45 minutes decorating. This is where you can add all those cute details that will truly make your cake shine. Finally, slice it up and serve; there’s no need to wait—everyone will be eager to indulge in this delightful creation!
For more tips on cake decorating, check out this helpful guide. Happy baking!
Nutritional Information for Hello Kitty Cake
When creating your delightful Hello Kitty Cake, it’s good to know what nutritional goodies are packed into each slice.
Calories Per Slice
Each slice of this charming cake typically contains around 300 calories. This makes it a perfect occasional treat rather than a daily indulgence. Remember, sharing can help lighten the calorie load!
Key Nutrients
The Hello Kitty Cake is not just fun but also offers some essential nutrients, such as:
- Carbohydrates: For that quick energy boost.
- Fats: These aid in nutrient absorption and provide flavor.
- Proteins: Contribute to muscle repair and growth.
For further insights on cake ingredients’ nutritional value, check out this USDA Food Composition Database.
Dietary Considerations
While this cake delights the taste buds, folks with dietary restrictions should note that it’s typically made with gluten and dairy. But don’t fret! Gluten-free and dairy-free alternatives are available to help you whip up a version that suits your needs. Seeking a community recipe? You might consider browsing forums like AllRecipes.
Preparing a whimsical Hello Kitty Cake doesn’t just fill the stomach; it also creates memories worth savoring!
FAQs about Hello Kitty Cake
Can I make Hello Kitty Cake ahead of time?
Absolutely! Planning ahead can be a lifesaver for busy schedules. You can bake the cake layers a day or two in advance. Just be sure to let them cool completely, wrap them tightly in plastic wrap, and store them in the fridge. If you’re feeling really organized, you can also prepare the frosting and decorations ahead of time. Just keep everything in separate airtight containers until you’re ready to assemble—this will keep the flavors fresh and the decorations intact.
How to store Hello Kitty Cake for freshness?
To maintain the scrumptiousness of your Hello Kitty Cake, store it in an airtight container at room temperature for up to three days. If you need a longer shelf life, refrigeration is the way to go. Just remember, refrigeration can dry out cakes, so you might want to bring it back to room temperature before serving. For those big cake enthusiasts, consider freezing slices! Wrap them in plastic wrap and then foil, and they can last for about three months in the freezer.
What can I use if I don’t have fondant?
No fondant? No problem! You can use buttercream frosting for a delicious and visually appealing alternative. It can be shaped and piped to create the same sleek, smooth look as fondant. You could also try chocolate ganache, which lends a rich chocolate flavor and can be poured over the cake for a glossy finish. If you want a healthier twist, consider using whipped cream or a cream cheese frosting—it’s just as delightful!
For more tips on baking and decorating cakes, check out related articles from reputable sources like Serious Eats or Bon Appétit. Happy baking!
Conclusion on Hello Kitty Cake
Recap of the Fun in Baking
Baking a Hello Kitty Cake is not just about mixing ingredients; it’s an enjoyable experience filled with creativity and laughter. Whether you’re decorating the cake to resemble the beloved character or experimenting with flavors, you’ll find joy in the process. Remember, each cake you bake is a canvas waiting for your personal touch, and this delightful project is ideal for all ages.
Your Invitation to Share
Now that you’ve got this recipe in hand, why not give it a try? Don your apron, gather your friends or family, and embark on this fun baking adventure together. Once you create your masterpiece, share your Hello Kitty Cake photos on social media or with friends. There’s nothing quite like inspiring others through your delicious creations. For tips on cake decorating techniques, check out this helpful guide to elevate your skills even further. Happy baking!
PrintHello Kitty Cake: The Easy, Adorable Treat Everyone Will Love
Discover how to make a delightful Hello Kitty Cake that is both easy to prepare and sure to impress. Perfect for birthday parties or any celebration!
- Prep Time: 20 minutes
- Cook Time: 30 minutes
- Total Time: 50 minutes
- Yield: 12 servings 1x
- Category: Dessert
- Method: Baking
- Cuisine: American
- Diet: Vegetarian
Ingredients
- 2 cups all-purpose flour
- 1 cup granulated sugar
- 1/2 cup unsalted butter
- 1 cup milk
- 2 eggs
- 2 tsp baking powder
- 1 tsp vanilla extract
- Pink food coloring (as needed)
- Frosting (for decoration)
- Black fondant (for eyes and whiskers)
Instructions
- Preheat the oven to 350°F (175°C).
- In a large bowl, cream together the butter and sugar until light and fluffy.
- Add the eggs one at a time, beating well after each addition, then mix in the vanilla extract.
- In another bowl, whisk together the flour and baking powder.
- Gradually add the dry ingredients to the wet mixture, alternating with the milk until everything is combined.
- If desired, add pink food coloring to achieve the desired shade.
- Pour the batter into a greased cake pan and bake for 25-30 minutes.
- Let the cake cool completely before frosting and decorating.
- Use the frosting to create a Hello Kitty face on top of the cake.
- Shape the black fondant into eyes and whiskers and place them on the cake.
Notes
- Ensure the cake is completely cool before decorating to prevent the frosting from melting.
Nutrition
- Serving Size: 1 slice
- Calories: 350
- Sugar: 20g
- Sodium: 200mg
- Fat: 15g
- Saturated Fat: 9g
- Unsaturated Fat: 4g
- Trans Fat: 0g
- Carbohydrates: 45g
- Fiber: 1g
- Protein: 4g
- Cholesterol: 50mg
Keywords: Hello Kitty Cake, adorable cake, cute dessert